
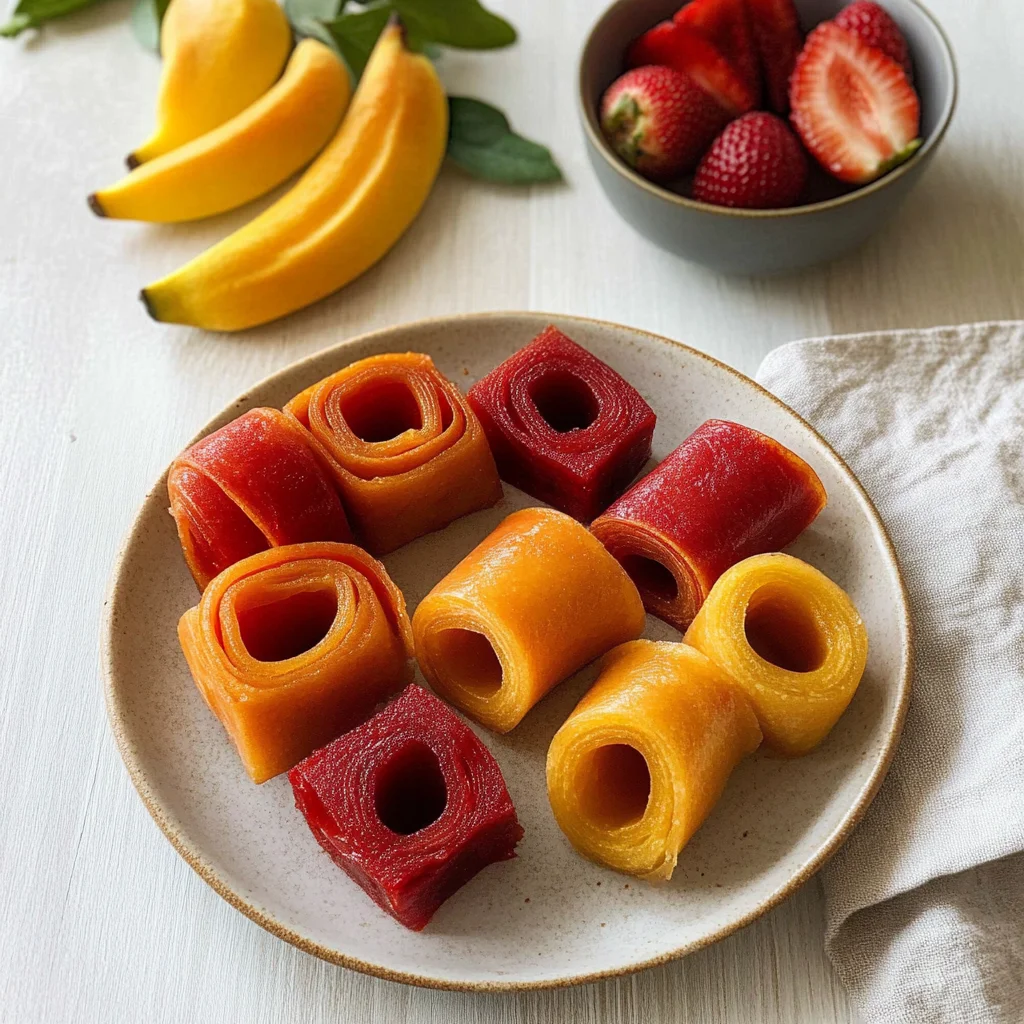
Imagine the sweet aroma of sun-drenched fruit wafting through your kitchen as you whip up a vibrant fruit roll-up recipe that’s not just delicious but also a healthy snack option. The chewy texture combined with the burst of fruity flavors will have your taste buds dancing, making it an irresistible treat that you can enjoy anytime, whether you’re packing lunchboxes or just snacking at home.
As you roll out your homemade creation, memories of childhood summers spent savoring store-bought versions flood back. This fruit roll-up recipe isn’t just about nourishment; it’s about reliving those carefree moments and sharing them with loved ones. Perfect for picnics or after-school snacks, get ready to dive into a flavor experience that promises to delight and surprise!
Why Does Everyone Love fruit roll up recipe?
Simple and quick to make, this fruit roll-up recipe takes just 15 minutes of prep time! Deliciously versatile, you can customize the flavors with your favorite fruits like strawberries, mangoes, or apples. Naturally sweetened with honey or maple syrup, it’s a healthier alternative to store-bought snacks. Packed with nutrients, these homemade treats are perfect for lunchboxes and after-school munchies. Plus, they look vibrant and appetizing, making them a hit with kids and adults alike!
fruit roll up recipe Ingredients
- 2 cups fresh fruit puree (e.g., strawberries, mangoes, or apples) – Choose your favorite fruits for a delicious and vibrant flavor.
- 1 tablespoon honey or maple syrup – Optional, adjust based on the sweetness of your fruit for added natural sweetness.
- 1 tablespoon lemon juice – To enhance flavor and preserve color, ensuring your fruit roll-ups look as good as they taste.
Step-by-Step fruit roll up recipe

1. Blend the fresh fruit puree of your choice, like strawberries, mangoes, or apples, along with 1 tablespoon of honey or maple syrup and 1 tablespoon of lemon juice in a blender until smooth. This vibrant mixture will be the base for your delicious snacks!
2. Preheat the oven to 170°F (75°C) and line a baking sheet with parchment paper. The low temperature is crucial for drying the fruit evenly without cooking it.
3. Pour the fruit puree onto the prepared baking sheet and spread it evenly to about 1/8 inch thick. Aim for a uniform layer to ensure consistent drying, which should take between 6-8 hours.
4. Place the baking sheet in the oven and let it dry until the fruit leather is no longer sticky—this could take several hours, so be patient and enjoy the sweet aroma wafting through your kitchen!
5. Remove from the oven once dried and let cool completely before cutting into strips. Rolling them up is part of the fun, creating perfect snack-sized portions!
6. Store your homemade fruit roll-ups in an airtight container or wrap them in parchment paper for easy snacking on-the-go. These treats are not only tasty but also healthy!
Optional: For a twist, try mixing different fruits together for unique flavors!
Exact quantities are listed in the recipe card below.
Expert Tips
- Fruit Choices: Select ripe fruits for optimal sweetness and flavor. Overripe fruits can lead to overly sweet fruit roll ups.
- Consistent Thickness: Ensure the puree is spread evenly at about 1/8 inch thick. Uneven thickness can cause some areas to dry out while others remain sticky.
- Monitor Drying Time: Keep an eye on the drying process; check after 6 hours. If it’s still sticky, give it more time, as humidity can affect drying.
- Storing Right: Allow the fruit roll ups to cool completely before storing to prevent moisture buildup in the container.
- Cutting Technique: Use a sharp knife or pizza cutter for clean edges when cutting the fruit roll up recipe into strips, making rolling easier.
How to Store and Freeze fruit roll up recipe
- Room Temperature: Store in an airtight container for up to 3 days, keeping them away from direct sunlight to maintain freshness.
- Fridge: For longer storage, refrigerate in a sealed bag or container for up to a week. This helps preserve the vibrant flavors of your fruit roll up recipe.
- Freezer: Freeze in individual pieces wrapped in parchment paper and then placed in an airtight bag for up to 3 months. Thaw in the fridge before enjoying.
- Reheating: If you prefer them warm, gently reheat using a microwave on low power for about 10 seconds. Enjoy your fruit roll up recipe fresh and delicious!
fruit roll up recipe Your Way
Feel free to unleash your creativity and customize these delicious snacks with your favorite flavors and textures!
- Berry Blast: Use a mix of pureed strawberries, blueberries, and raspberries for a tangy, vibrant treat. The combination of sweet and tart will excite your taste buds and make snack time extra fun!
- Tropical Twist: Combine mango and pineapple puree for a refreshing bite that transports you to the beach. This sunny flavor is perfect for brightening up lunchboxes or afternoon snacks.
- Apple Cinnamon: Blend apples with a sprinkle of cinnamon for a cozy, autumn-inspired roll-up. This variation is not only comforting but also great for getting kids to enjoy their fruit.
- Green Goodness: Try spinach or kale mixed into your fruit puree for an added nutrient boost. While it may sound unusual, the sweetness of the fruits will mask the greens beautifully, making it a clever way to sneak in veggies!
- Spicy Kick: Add a pinch of cayenne pepper or chili powder to your fruit mix for a surprising twist. This unexpected heat creates an exciting flavor profile that’s sure to awaken your palate.
- Nutty Flavor: Swirl in some almond or peanut butter into your fruit puree for added richness. This creamy addition gives a satisfying texture while providing healthy fats and protein.
- Citrus Zing: Experiment with different citrus juices like orange or lime instead of lemon juice. These zesty options can elevate the overall flavor profile and add brightness to each bite.
Make Ahead Options

Preparing this homemade fruit roll-up recipe is a fantastic way to streamline your meal prep! You can create the fruit puree in advance by blending 2 cups of your favorite fresh fruits, like strawberries or mangoes, with 1 tablespoon of honey (if desired) and 1 tablespoon of lemon juice until smooth. This puree can be made up to 24 hours ahead and stored in the refrigerator. When you’re ready to finish the fruit roll-ups, simply pour the puree onto a lined baking sheet and spread it evenly. After drying in the oven at 170°F (75°C) for 6-8 hours until it’s no longer sticky, let it cool before cutting into strips. For optimal freshness, store them in an airtight container or wrapped in parchment paper for easy snacking later on. By prepping these components ahead of time, you’ll have delicious, healthy snacks ready when you need them!
Everything You Need to Know About fruit roll up recipe
Can I use frozen fruit for this fruit roll up recipe?
Absolutely! Frozen fruit can work wonderfully in this recipe. Just make sure to thaw and drain any excess liquid before blending. This will help achieve that perfect smooth puree texture.
What’s the best way to store homemade fruit roll-ups?
Once your delicious fruit leather has cooled, store it in an airtight container or wrap each roll-up in parchment paper. This keeps them fresh and makes for easy snacking! They can be kept at room temperature for about a week or stored in the refrigerator for up to two weeks.
How can I adjust the sweetness of my fruit roll-ups?
If your chosen fruits are on the sweeter side, feel free to omit the honey or maple syrup completely. For tart fruits like green apples, adding a tablespoon of honey is a great way to balance flavors. Remember, tasting as you blend is key!
How long does it take to dry the fruit puree in the oven?
Drying time can vary based on humidity and thickness, but generally, you’ll want to allow 6-8 hours at 170°F (75°C) until the fruit leather is no longer sticky. Keep an eye on it after the 6-hour mark; you want it firm yet pliable.
Can I freeze my homemade fruit roll-ups?
Yes! You can definitely freeze your fruit roll-ups for later enjoyment. Once they’re completely cooled and rolled up, wrap them tightly in plastic wrap and place them in a freezer-safe bag. They can last for up to six months—just thaw them overnight in the fridge when you’re ready to snack!
What fruits work best for this recipe?
You have so many options! Strawberries, mangoes, or apples all make excellent choices. Feel free to experiment with combinations too! Just remember that fruits with higher water content may take longer to dry out thoroughly.
Fruit Roll-Up Recipe
Ingredients
Method
- Blend the fresh fruit, honey (if using), and lemon juice in a blender until smooth.
- Preheat the oven to 170°F (75°C). Line a baking sheet with parchment paper.
- Pour the fruit puree onto the prepared baking sheet and spread it evenly to about 1/8 inch thick.
- Place the baking sheet in the oven and let it dry for 6-8 hours, or until the fruit leather is no longer sticky.
- Once dried, remove from the oven and let cool. Cut into strips and roll them up.
- Store in an airtight container or wrap in parchment paper for easy snacking.